Important: The information presented here is for the use of a qualified, experienced technician. Without the background knowledge which comes with training, you risk doing more damage then good to the copier & also risk your own safety. If you are not willing to take 100% responsibility for your actions, do not use the information posted here. Thank you. Read our conditions of Use for more information.
DC700 / C75 / J75 - Solving Duplex Jam problems
DCP700/J75 - Solving Duplex Jamming Problems
| Technical Specifications |
|---|
It’s time for a good two-sided adventure. When they’re working right, the Duplex Transports on the DCP700’s, & C75/J75’s, do a wonderful job moving paper. When something starts slipping however, and pages start jamming (often intermittently), it can lead to frustration for a technician—a major time-sink. Having a clear understanding of all the moving parts, and knowing what to replace, is key to saving time in solving the problem. We will cover the many parts in the Upper Chute Assembly, the pinch rolls on the Lower Chute, and the idler pulleys & drive belt on the inner front wall of the Main Transport Drawer.
We will concentrate on the DCP700 / DCP700i / DCP770, C75 / J75 models, although a lot of this information will prove similar for the Versant V80, V180 as well. Some of the Duplex Jam Fault Codes which you might be seeing when these components start slipping or failing include:
077-129 / 077-130 : Duplex Out Sensor did not see paper after Duplex In Sensor was activated.
Component Control Codes (Dc330) relating to Duplex sensing and transport: Input Codes (Sensors… L (low) = Paper Sensed, H = No Paper Sensed): 077-113 - Duplex In Sensor (put white paper under sensor… should change to “L” on screen) 077-115 - Duplex Out Sensor (put white paper under sensor… should change to “L” on screen) Output Codes (Motors): 077-048: Inverter Drive Motor - Also check the motor’s wound resistance (should measure approx. 1.3 ohms) at P/J 246, pin 2 to pins 1 or 3, and pin 5 to pins 4 or 6. 077-052: Duplex Drive Motor - Also check the motor’s wound resistance (should measure approx.. 0.8 ohms) at P/J 266: pin 2 to pins 1 or 3, and pin 5 to pins 4 or 6.
There are several areas that have parts relating to duplexing: - Duplex Lower Chute (6 pinch rollers with their springs) - Drive Motor Assembly (motor, gears and drive coupling) - Duplex Upper Chute Assembly (drive gears, one-way drive pulleys, and 6 transport rollers with their associated bearings) - Main Transport Drawer (idler pulleys & drive belt)
The Lower Chute Assembly is the metal plate that drops down to allow the customer to clear jams from the duplex area. The only parts on the Lower Chute of significance would be the 6 Pinch Roll Assemblies (hard plastic) and their retaining springs, which maintain nip pressure. If you find the paper is skewing in the duplex, you would want to check these pinch rolls to make sure they all spin easily enough (clean the plastic cradle bearings, check that they are not out of round from wear, and add a drop of silicon gear grease for lubrication). Also, check the tension springs are all providing similar pressure. If these Pinch Rollers don’t turn easily, they will add a lot more stress on the whole drive train, so checking and oiling them is an important first step.
The Duplex Drive Motor Assembly (068K59340) is seldom the cause of drive problems. The motor has a part number on its label: 127K52720, although that number is invalid.
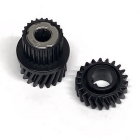
The Drive Assembly’s coupling drives a matching coupling on the rear of a shaft on the left side of the Duplex Upper Chute Assembly. The drive shaft reaches to the front of the unit, where you will find a 22-toothed D-Shaft Drive Gear, which mates up with a One-Way Drive Gear / Pulley (20T/24T) on the front end of the Duplex Out Roller (we sell the two gears in a Duplex Drive Gear Kit: DC700DXDGK). Then this piece drives the Duplex Drive Belt, which moves a series of one-way pulleys to turn the rest of the Duplex Rollers on the Upper Chute Assembly.
The Upper Chute Assembly is mounted under the Main Transport Drawer. The drive belt gets its tension from a series of Idler Pulleys (some toothless and some 24T) mounted on the inner front wall of the Main Transport Drawer.
Most duplex jamming problems stem from increasing friction (due to dirt and wear of the pulleys and bearings) and the subsequent failure of the one-way clutches (pin-bearings) found in the Drive Gear / Pulley and the 3 One-Way Pulleys. Getting to the Duplex Drive Belt and the Upper Chute Assembly takes a little bit of doing.
Removing the Duplex Drive Belt and Upper Chute Assembly:
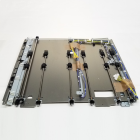
- Pull the Main Transport Drawer (Transfer Drawer) out to the Service Position. - Remove the Drawer Front Covers: left cover (3 screws), Fuser Release Cover (2 screws), center cover (2 screws), right cover (2 screws), and the drawer handle (2 screws) - Lift the Fuser out - Remove the 2nd BTR Assembly: disconnect a connector and a high voltage lead, take off 2nd BTR front cover (1 screw), and then rock the unit towards the right to lift it out. - Remove the Registration Module: disconnect 4 connectors at front, remove 2 screws (one front left, one rear left), and remove the spring loaded guide pin near the front end of left rail (3 screws and rotate the spring / pin assembly (be careful as it is spring loaded). - Remove two metal brackets inside the front wall of Main Drawer: left bracket (3 screws), central bracket (2 screws). - Remove the Duplex Drive Belt Tension Pulley Bracket (1 screw). - Remove the Duplex Drive Belt, taking careful note of how it is routed (see Photo #1 below for the layout, as viewed from the front end) - At this point, getting the Upper Chute Assembly off is easy enough:
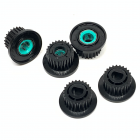
Here is a quick anatomy of the Duplex Upper Chute Assembly… The Duplex In Rollers (x2) on the right end of the Assembly are driven by ‘D’ shaft pulleys which don’t tend to wear out. Then the next 3 rollers we will call the “Duplex Transport Rollers.” Those 3 are all driven by One-Way Drive Pulleys. The one-way clutches in these pulleys can get weak over time and so should be replaced if the duplex is slipping. Similarly, the Drive Gear / Pulley on the front of the Duplex Out Roller (that is the roller on the far left) also has a one-way bearing which can start slipping. All three One-way Pulleys and the One-Way Drive Gear / Pulley should drive faithfully in the clockwise direction. If you suspect these are slipping, also check the front ends of the shafts where these pulleys are seated. Look for signs of the metal itself getting worn out (discoloration and a change of texture). Replace any Duplex Rolls which prove to be worn out in this way. The wearing only tends to happen if the one-way pulley has already failed and is slipping on the shaft, so catch it early if possible.
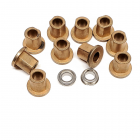
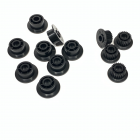
Note that there is also an Idler Pulley improvement kit that was introduced which has a set of toothless idler pulleys with a pair of ball bearings added to the centers of each. 655N00388 came with 7 idler pulleys, 14 flanged bearings, & 14 white o-rings. Strange because the kit seems to be one piece short. Then there’s 655N00588 which has only 5 idler pulleys, 10 bearings, and 10 O-rings. See both choices below.
We offer a few kits that address duplex jamming problems:
First... here are the parts for repairing the Duplex Upper Chute Assembly:
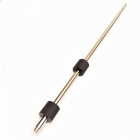
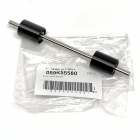
DC700DXDGK - Duplex Drive Gear Kit:
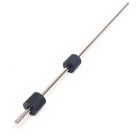
DC700DXDPK - Duplex Drive Pulley Kit: [x3 One-way Drive Pulleys & x2 D-shaft Drive Pulleys (499W14124)]
Also, check the oilite bearings that the duplex transport rolls ride on (check these for being oblong and clean them and the transport roll shafts thoroughly… replace if needed):
For the Idler Pulleys inside the front of the Main Transport Drawer... we offer two choices:
The cheaper choice is the original all-plastic pulleys (clean off the shafts good and add a drop of lubricant / gear oil on each pulley as you install them):
OR ... there is an improved version of these pulleys that each has a pair of ball bearings in the center of each pulley... This is recommended for a very long life, especially if you run the machine heavily:
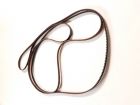
Don’t forget the Drive Belt itself:
- Duplex In Rollers (x2): (059K55960) - Duplex Transport Rollers (x3): (059K54440) - Duplex Out Roller (x1): (059K54430)
That just about covers both sides of it all! :)
|
| Information Reference |
Author: Britt Horvat This is one of our own Partsdrop Write-ups. We hope you find it helpful! |


Related Products