Important: The information presented here is for the use of a qualified, experienced technician. Without the background knowledge which comes with training, you risk doing more damage then good to the copier & also risk your own safety. If you are not willing to take 100% responsibility for your actions, do not use the information posted here. Thank you. Read our conditions of Use for more information.


C35 style - Fuser Thermistor Repairs

C35 style - Fuser Thermistor Repairs

Technical Specifications

For C35 style:

For Xerox® families (Models): 5890 family (WC-5890, 5875, 5865, 5855, 5845),
5790 family (WC-5790, 5775, 5765, 5755, 5745, 5735, 5730),
5687 family (WC-5687, 5675, 5665, 5655, 5645, 5638, 5632), 
275 family (WC-275, 265, 255, 245, 238, 232, 175, 165, M175, M165, Pro275, Pro265, Pro255, Pro245, Pro238, Pro232),
Pro55 family: (CopyCentre: C35, C45, C55, WorkCentre: M35, M45, M55, Pro35, Pro45, Pro55), 
& DC555 family (DocumentCentre: DC-555, 545, 535, DC555, DC545, DC535) 

Fuser Thermistor Repairs

           
C35 Fuser Thermistor Repairs Header


When rebuilding the fuser module, it is a good idea to re-tape the thermistor heads.  This is because when the tape wears out as it often will during the second cycle, damage can result to both the thermistors and the Fuser Heat Roller’s surface. 


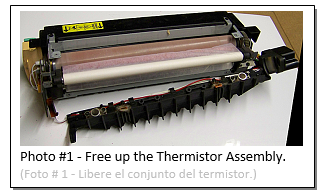
  1.  Remove two screws and disconnect the two front Fuser Heat Lamp terminals to release the Thermistor / Thermostat Assembly. (see photo #1).
         
    C35 Fuser Thermistor Repairs Photo #1
         
  2. Release the two Thermistor heads from the assembly (1 screw each).
       
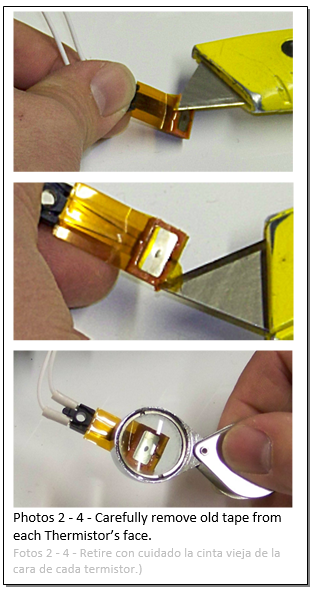
  3. Carefully use a utility knife to slice the tape on either side of the Thermistor’s contact face (see photo #2 and 3).  Do not try to remove the tape from the rest of the thermistor… only the part on the face which contacts the Heat Roll’s surface.  Peel off any residual tape on the Thermistor’s contact face (photo #3).  You may want to use a magnifying glass to check your work.  Be very gentle… you do not want to damage the orange spongy pad nor the thermistor’s wires. 
         
    C35 Fuser Thermistor Repairs Photo #2-4
        
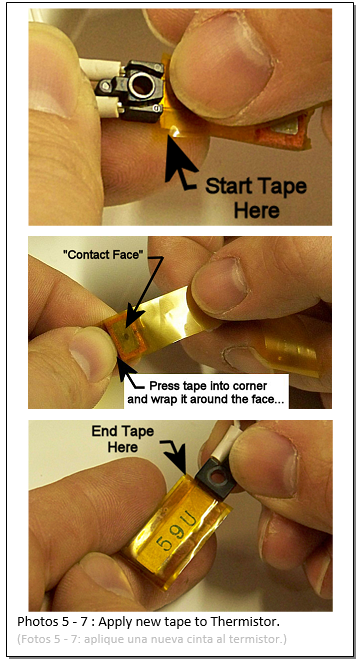
  4. Apply new tape to the Thermistor’s head lengthwise (see photos 4-6).  Start it near the base on the side which has the contact face (see photo 4)… put it on nice and evenly, gently pressing it into the corner of the thermistor head (see photo 5) and then wrapping it around the Thermistor’s face, ending at the opposite side of the base (see photo 6).  Use your thumbnail to press the tape to all surfaces thoroughly especially on the contact face. 
          
    C35 Fuser Thermistor Repairs Photo #5-7
          
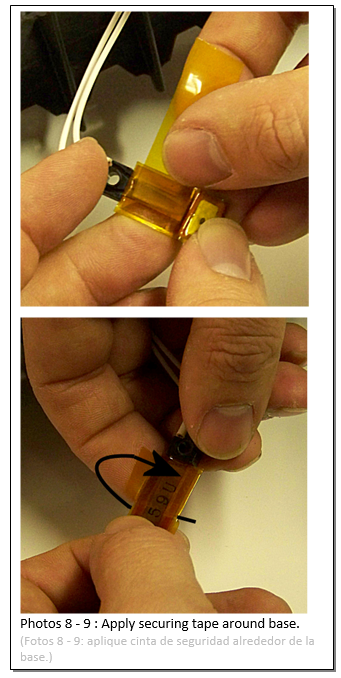
  5. Next you will apply a layer of tape in the perpendicular direction (around the base) to keep the first piece of tape better secured.  (See photo #7).  Do not cover the Thermistor’s contact face with a second layer of tape.


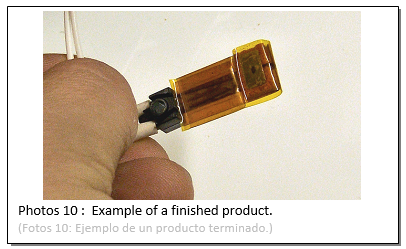
C35 Fuser Thermistor Repairs Photo #8-9  C35 Fuser Thermistor Repairs Photo #10


That’s it!  You have given new life to your thermistors so they will last another full fuser life without a problem.  (See photo #8 to see a finished product)


Information Reference
Written by Britt Horvat for our own beloved website: www.partsdrop.com :)