Important: The information presented here is for the use of a qualified, experienced technician. Without the background knowledge which comes with training, you risk doing more damage then good to the copier & also risk your own safety. If you are not willing to take 100% responsibility for your actions, do not use the information posted here. Thank you. Read our conditions of Use for more information.
Install Phase Incomplete, System Unavailable, or Speed Configuration Mismatch
What do you do if one of these machines loses its memory? Its not all that straight forward so we gathered any info we could find in the manual on the subject and put it into one article. Hopefully it will help you solve the problem.
| Technical Specifications | ||||||||||||||||||||||||||||||||||||
|---|---|---|---|---|---|---|---|---|---|---|---|---|---|---|---|---|---|---|---|---|---|---|---|---|---|---|---|---|---|---|---|---|---|---|---|---|
“System Unavailable, do not power down until the power down message appears” The Xerox support site recommends to customers: Wait at least 10 minutes till the “Power Down” button becomes available. If possible use the button on the User Interface (U.I.). If no button appears, attempt to use the Power Button on the left side of the machine. If that also fails to power down the machine, the Xerox support site recommends only then you should unplug the machine and wait at least 10 minutes before plugging it back in and trying to power it on again. These machines HATE having the power disconnected… it causes a lot of software problems.
“Install Phase Incomplete” or “Speed Configuration Mismatch” You may see these messages or other odd messages if there is a loose Software Module (read below about what to do if the machine was recently moved), or if the Memory Backup Battery on the “Software Module” dies or you’re replacing the Software Module (with a new one or one from another machine).
If the machine was recently moved, the first thing you’ll want to try is checking the connections. Power down completely, then go re-seat the Software Module and the system Memory DIMMs which are found in the Image Processing drawer at the top rear of the machine. These little sub-boards are standing up in card connectors on the Image Processing Board. . Sometimes that’s all that is wrong. Use Stabilant 22 on the card pin connections to help make an improved electrical connection which is protected against future contaminants and oxidation formation on the contacts.
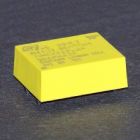
Checking the NVM Memory Backup Battery: If you suspect the NVM has become corrupted by a failing Memory Backup Battery, here are details on how to check the battery: Measure across the two legs on the opposite end of the battery from where the dot is found. You should read between 2.8 and 3.0 Volts if the battery is good. The battery can be ordered under the part number C35MBB. When replacing the C35MBB… the battery is a yellow rectangular snap-on type of battery on the Software Module sub-board on the Image Processing Board. You will want to slip a small flathead screwdriver blade under the battery and lift straight up till two contact points come loose, then go to the other side and do the same. If you try to “Pry” the battery up, you risk breaking the piece underneath which the battery snaps onto. Important NOTE: if you remove a battery, you will want to install the new one within 30 seconds to retain whatever memory settings are currently on the Software Module.
After replacing the Memory Backup Battery, or the Software Module… If you don’t have access to someone with a PWS to do the proper NVM Restore, or you don’t have the NVM backup disk, you will need to re-program the memory settings manually from NVM Read / Write in diagnostics. Below are the critical NVM codes which need to be set correctly to match the machine’s original configuration. You must have these all agree as to what speed the machine is set up for. There are physical differences between the 32/35/38 ppm models and the 45/55 ppm models, and the 65/75/87 ppm models. Do not try to change these settings away from their original settings which match the actual model and speed of machine you’re working on.
Most Critical Memory Adjustment Codes (NVM):
***03-008 (Product Identifier) Settings for each particular model and configuration: Note: (AMF = Advanced Multifunction options (includes network scanning etc), BMF = Basic Multifunction, PS = Postscript option included, DC = Digital Copier (copying only), ST = Multifunction) DC555 Family: 535ST=33, 545ST=35, 555ST=37, DC535=32, DC545=34, DC555=36 WC-Pro-55 Family: WC-Pro35=48, WC-Pro45=49, WC-Pro55=50, WC-35=51, WC-45=52, WC-55=53, WC-5030/5050: WC5030=(???) WC-5050=(???) These 2 models are not shown in any of the books we've seen so far. If you have a working machine, please email us to let us know what the correct setting is for the 5030 or 5050. Thanks! WC-275 Family: (AMF = Advanced Multifunction option, BMF = Basic Multifunction option:, PS=w/ Postscript) WC-232BMF+PS=81, WC-238BMF+PS=82, WC-245BMF+PS=83, WC-255BMF+PS=84, WC-232AMF=85, WC-5135/5150: WC5150=159, WC5135=(???) These models are not shown in any of the books we've seen so far. If you have one, please email us to let us know what the correct setting is for the 5135. Thanks! (Thank you Taylor for telling us about the 5150!) WC-5687 Family: WC5645 DC=106, WC5655 DC=107, WC5665 DC=108, WC5675 DC=109, WC5687 DC=110, WC5655 AMF=125, WC5665 AMF=126, WC5675 AMF=127, WC5687 AMF=128, WC5632 AMF=135, WC5638 AMF=136, WC5632 BMF+PS=139, WC5638 BMF+PS=140, WC5632 BMF=141, WC5638 BMF=142, WC5632 DC=143, WC5638 DC=144 Once you have all those critical settings right, you will still likely need to do the Registration Adjustments and run the machine to see if anything else needs to be tweaked or corrected. The best way is always to get a Xerox tech with the PWS laptop to come in and restore all the original settings. |
||||||||||||||||||||||||||||||||||||
| Information Reference | ||||||||||||||||||||||||||||||||||||
| This information is drawn from an article originally published in ENX Magazine, written by our own Britt Horvat |
Related Products